Article introduction
Part 2 Full text with 4,300 words and 80 pictures.
The original text is in Chinese, and it was translated by Google.Please understand that there are some unsatisfactory words!The original text can be viewed at https://www.song1118.com.
The article is divided into the following chapters:
Dismantling and Send
Act freely
Press the bridle
Dismantling and Send
Dismantle: dismantle, refers to dismantle and read incoming calls;
Send: send out. Generally, when the chief is away, a dedicated person is responsible for reading, reviewing, approving, and processing official documents. Generally used to describe a position with great power.
P15G2, P17G2, and ThinkPad T15g Gen 2, the official hardware maintenance manuals of the three share one, which means that the three are basically the same in physical architecture; but in the hardware maintenance manual, you can still find that there is a difference between P15G2 and P17G2. In some places, there are still obvious differences.
As a real end user, even the author has a rare opportunity to disassemble the two at the same time and compare them together. Before that, I have never seen an official or a third party disassemble and compare the two. Therefore, this The comparison of the preliminary dismantling of the two can be regarded as a literal "Dismantling and Send".

The physical architecture of the P15G2 and P17G2 is basically the same, and the disassembly process is basically the same. Therefore, the disassembly steps explained in the following pictures and texts are only for P15G2. In the comparison section, the two will be displayed at the same time for comparison.
Before disassembling, first boot into the BIOS System Setup of the P15G2, disable the internal battery, and automatically shut down after confirmation, disconnect the external power supply, at the bottom of the P15G2, loosen a screw that locks the bottom door (Bottom door), and carefully pry open the buckle , You can remove the bottom door.
Inside are dual M.2 SSD slots and stepped dual memory slots. The two M.2 SSD slots are in PCIe 3.0 x 4 transmission mode. These are exactly the same as the previous generation.

The only difference is that due to the upgrade of the chipset platform, the memory officially supports DDR 4 3200MHz;
As a reminder, P15G2 has four memory slots. According to the official requirements, when the number of memory is not more than 3, it must be installed in the two slots at the bottom first, otherwise it will not start or run abnormally.

After removing the bottom door, the next step is to remove the keyboard. You need to loosen the two screws at the bottom, as shown in the yellow box in the figure below.

Next, open the top cover of the screen and push the keyboard flat toward the screen to lift the front of the keyboard, and then take the entire keyboard out of the C side:

After taking out the entire keyboard from side C, it cannot be taken off immediately. You need to loosen the two connecting cables between the back of the keyboard and the motherboard.
Pay attention to the back of the keyboard, marked GP540 and GP740, which should be the internal codes of P15 and P17 --- I guess the meaning is as follows:
GP stands for Gaming and Professional, that is, the "g" of T15g and the "P" of P15/17, but there is no T17g;
5 and 7 naturally correspond to P15 and P17;
As for 40, it should be counted from P50/P70, through the four generations of 10, 20, 30 to 40.

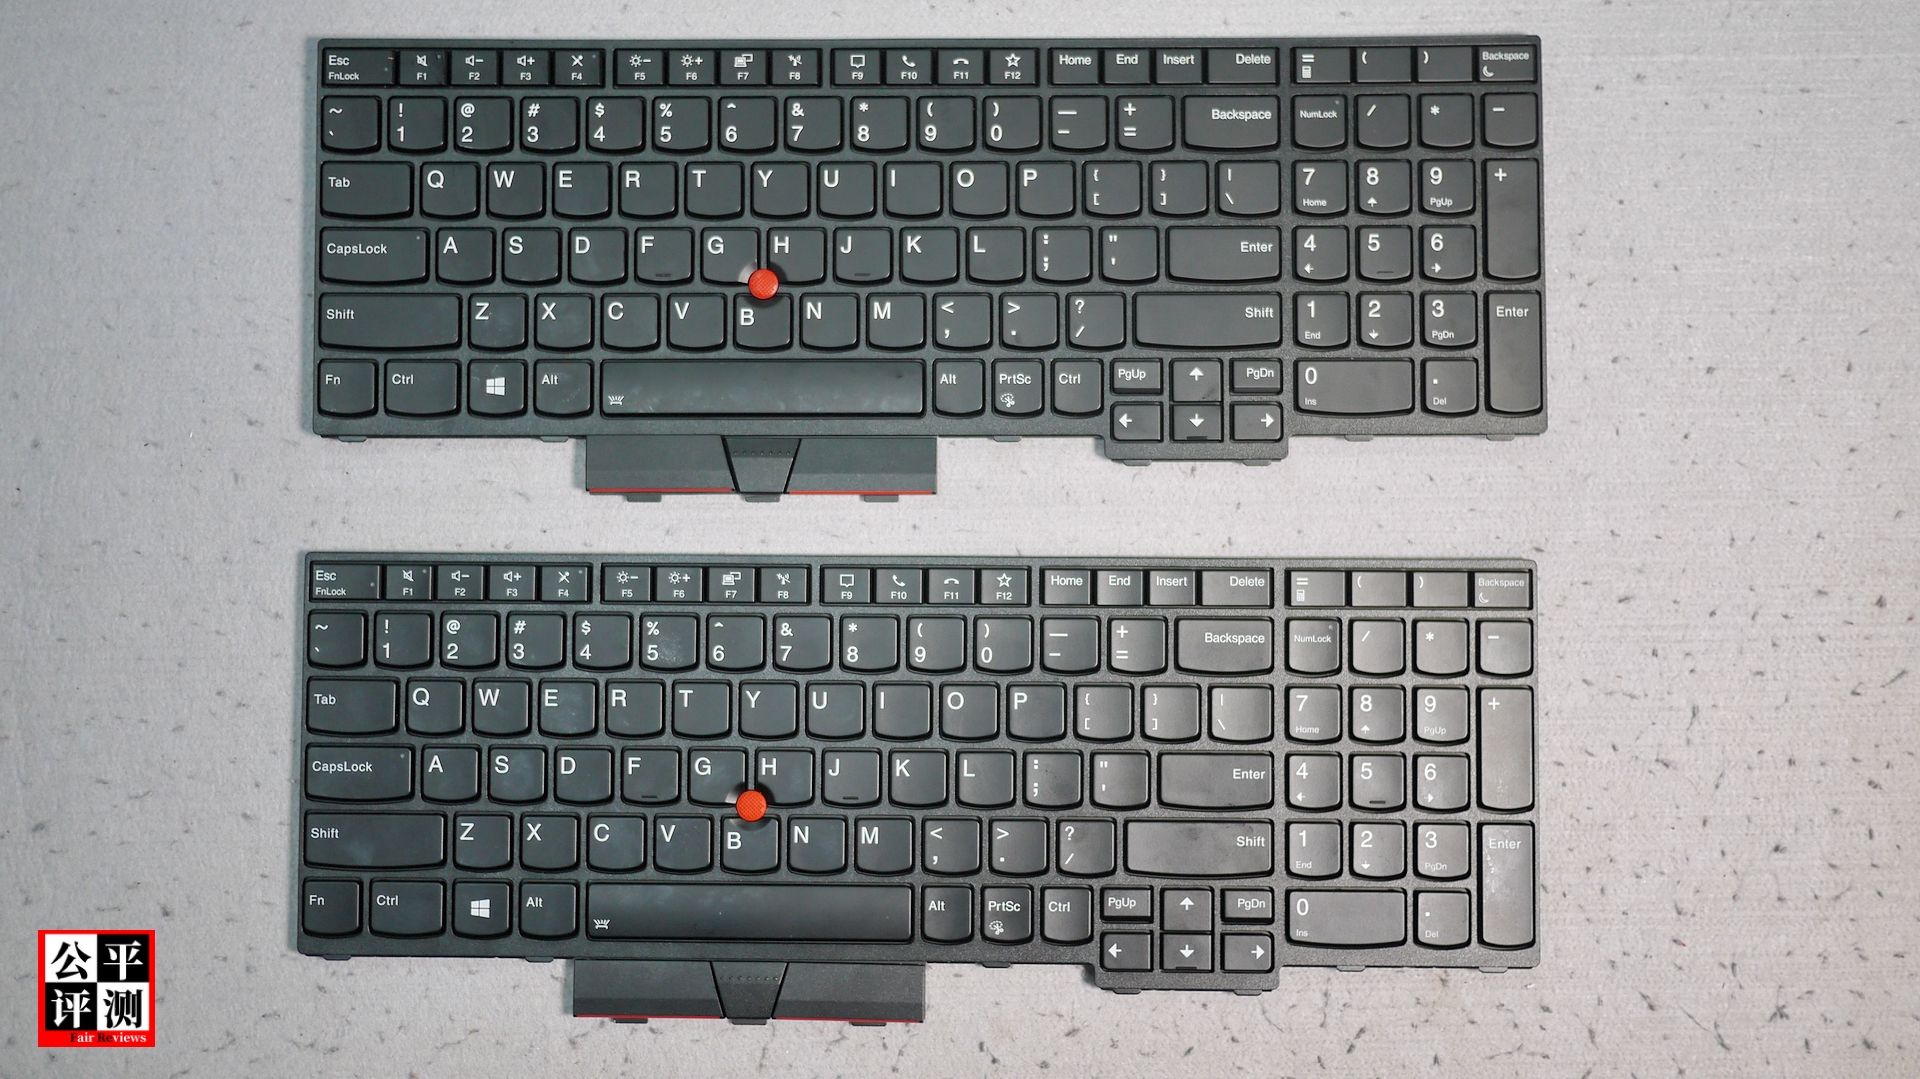
Then you can take down the entire keyboard: P15G2 and P17G2, as well as the previous generation, the four keyboards are completely common, and the backs are marked with GP540 and GP740.

The picture below compares the keyboard with the P15G2 removed and the keyboard of the ThinkPad P71. It can be clearly seen that the keyboards of the P15G2 and P17G2 are compressed in width compared to the P70/P71.

View of the C side of P15G2 after removing the keyboard:
In the lower left corner is a vacant M.2 3042 slot for installing a wireless wide area network card (WWAN), but because the factory configuration has no WWAN card, neither a WWAN antenna nor a SIM card slot, it is difficult for users to install it later.

In the center of the C surface under the keyboard is the memory module bracket. You need to loosen and remove the three screws before removing it. The back of the memory module bracket is equipped with a heat-dissipating silicone grease pad.

Take it down and you can see another connected memory slot under the keyboard, as well as the main M.2 SSD on the right. Compared with the previous generation, the main change of the P15G2 is the addition of an M. 2 2280 SSD slot, this slot supports PCIe 4.0 x 4 transmission channel SSD, the back of the memory module bracket is equipped with a heat dissipation silicone grease pad, which is used for the heat dissipation of the SSD in this part.

At this point, the storage system of this P15G2 can be completely removed: 4 32GB DDR4 3200MHz Samsung memory, plus a Samsung 1TB PCIe 4.0 NVMe SSD.

Next, prepare to remove the keyboard bezel assembly on the C side. You need to loosen the 5 screws at the bottom marked by the yellow box in the following figure:

Then at the lower right corner of the C-side keyboard frame, release the buckle and unplug the connection cable between the motherboard and the fingerprint reader, and then unplug the connection cable between the power button and the motherboard.

Next, you can only use feminine force to carefully loosen the multiple buckles between the keyboard frame and the base of the fuselage.
And carefully pull out the two elastic tapes on both sides of the touchpad-these two elastic tapes are more annoying, and may be broken or severely deformed if you are not careful-the official also has a special reminder, elastic If the tape is damaged and needs to be replaced, I really don’t like this design.

Finally, the keyboard frame can be completely removed.
The back of the keyboard frame only has a fingerprint reader and a power button in the corner.

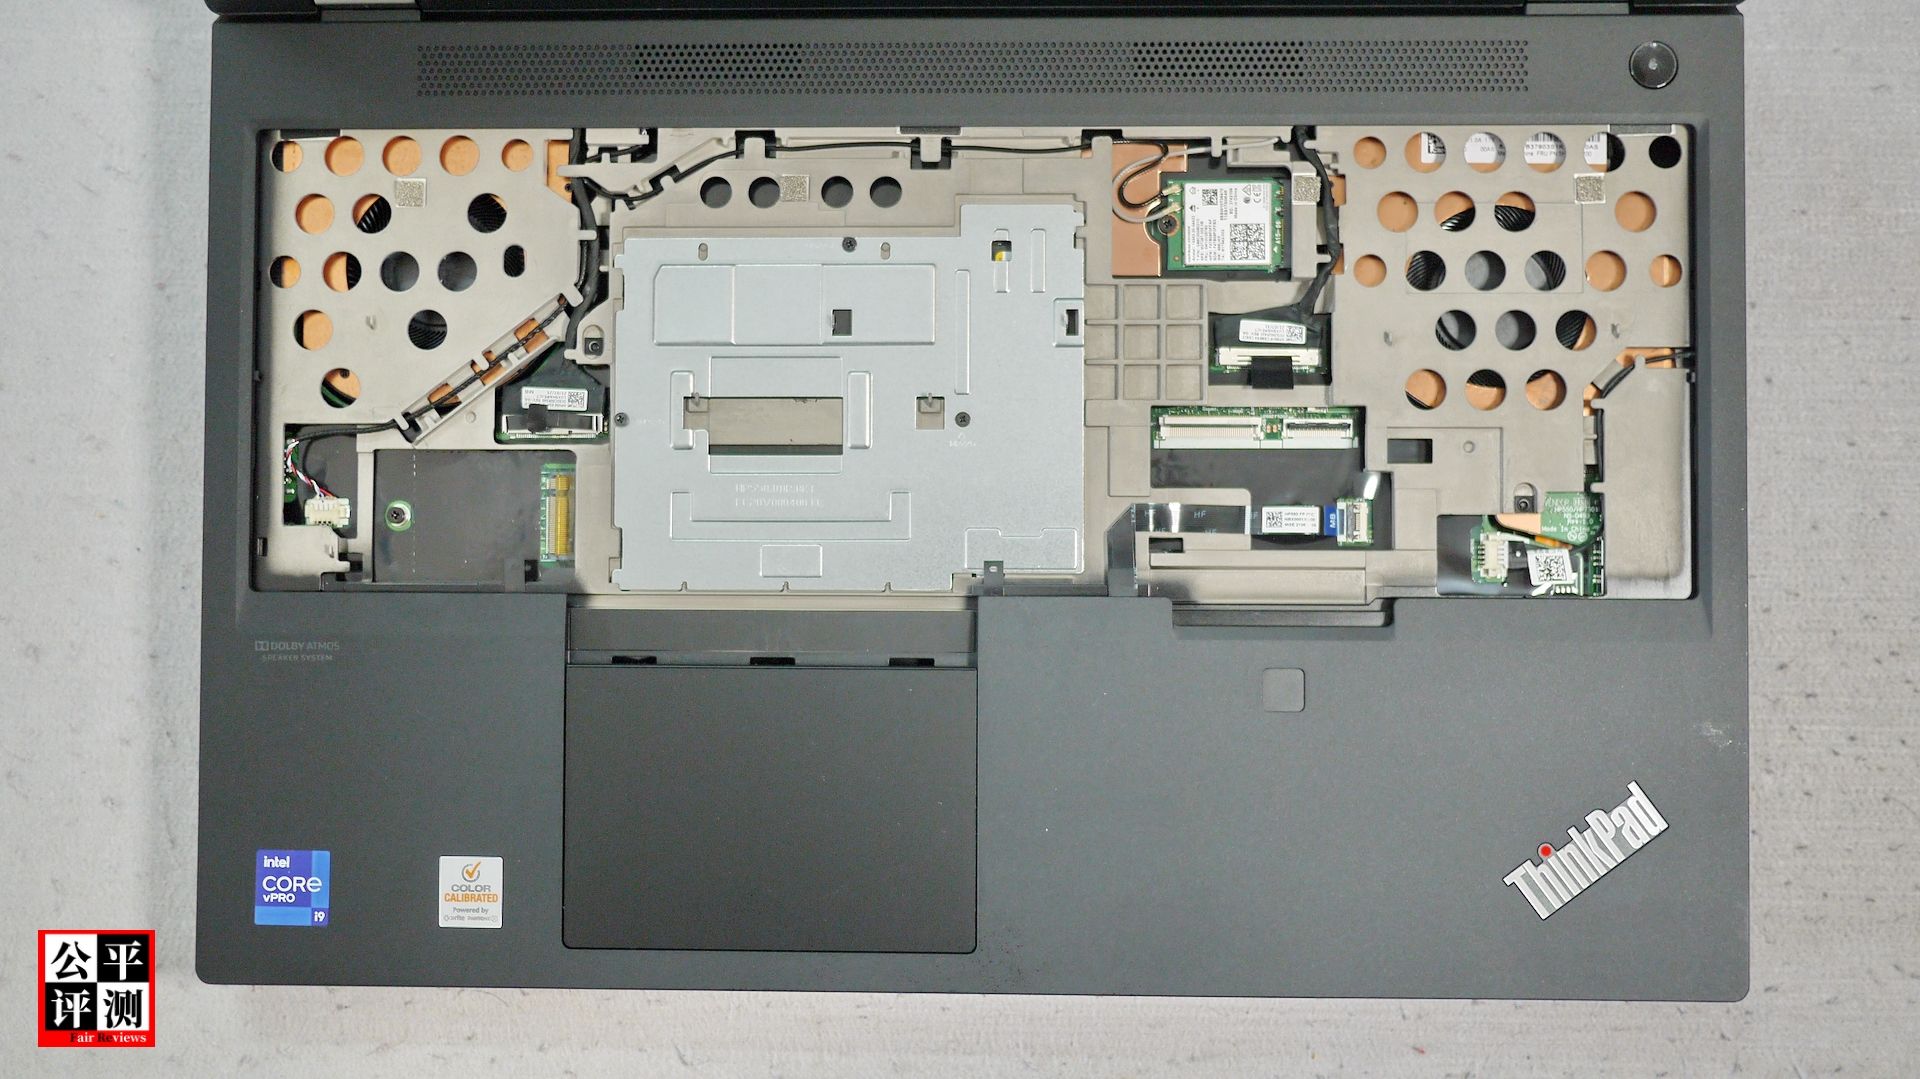
View of the C side of P15G2 after removing the keyboard frame:

You can clearly see the layout and direction of multiple cables:
On the left is the camera cable from the motherboard to the upper cover of the screen, the connection cable between the motherboard and the speaker, if it is a model with a pre-installed WWAN card, there will naturally be four WWAN antenna cables;
On the right is the connection cable between the screen and the motherboard;
In the right part of the middle, there are two antennas from the wireless network card, each going to the left and right sides of the screen.

The touchpad of the P15G2 is not integrated with the keyboard frame, but is independently fixed on the roll cage. This should be the reason for using the elastic tape mentioned above-because the keyboard frame and the touchpad are not a whole, the keyboard frame It is not convenient to use buckles or screws to fix it here, and only two elastic tapes can be used.

This P15G2 does not have a smart card reader pre-installed at the factory, so the SC card part on the right side of the palm rest is filled with a black plastic block.

The P15G2 speaker is located at the center of the C side near the B side. Compared with the long strip large-area fine-hole grille seen on the C side, the speaker's caliber is disappointing, but it looks like the overall cavity volume. It's not small, so its sound quality may not disappoint.

Next, loosen the 5 screws at the bottom marked by the yellow box as shown in the figure below:

Finally, you can remove the base cover assembly. When removing it, pay attention to the multiple buckles and do not damage the rear port of the fuselage.

List of internal testing of the removed bottom cover:

Plastic modules are used to fill in two places on the inside:

This kind of filling module makes the author suspect that it was originally used when it was originally designed, but it was abandoned and hurriedly repaired with the module. Why else is it superfluous?

After removing the bottom cover, you can finally see the whole picture of the bottom of the fuselage:
The upper part is a huge heat dissipation module composed of dual fans, four heat pipes, and eight fixing screws. The whole is blackened and the focus is on the center of gravity.
Below is a relatively thin, long-strip built-in battery.
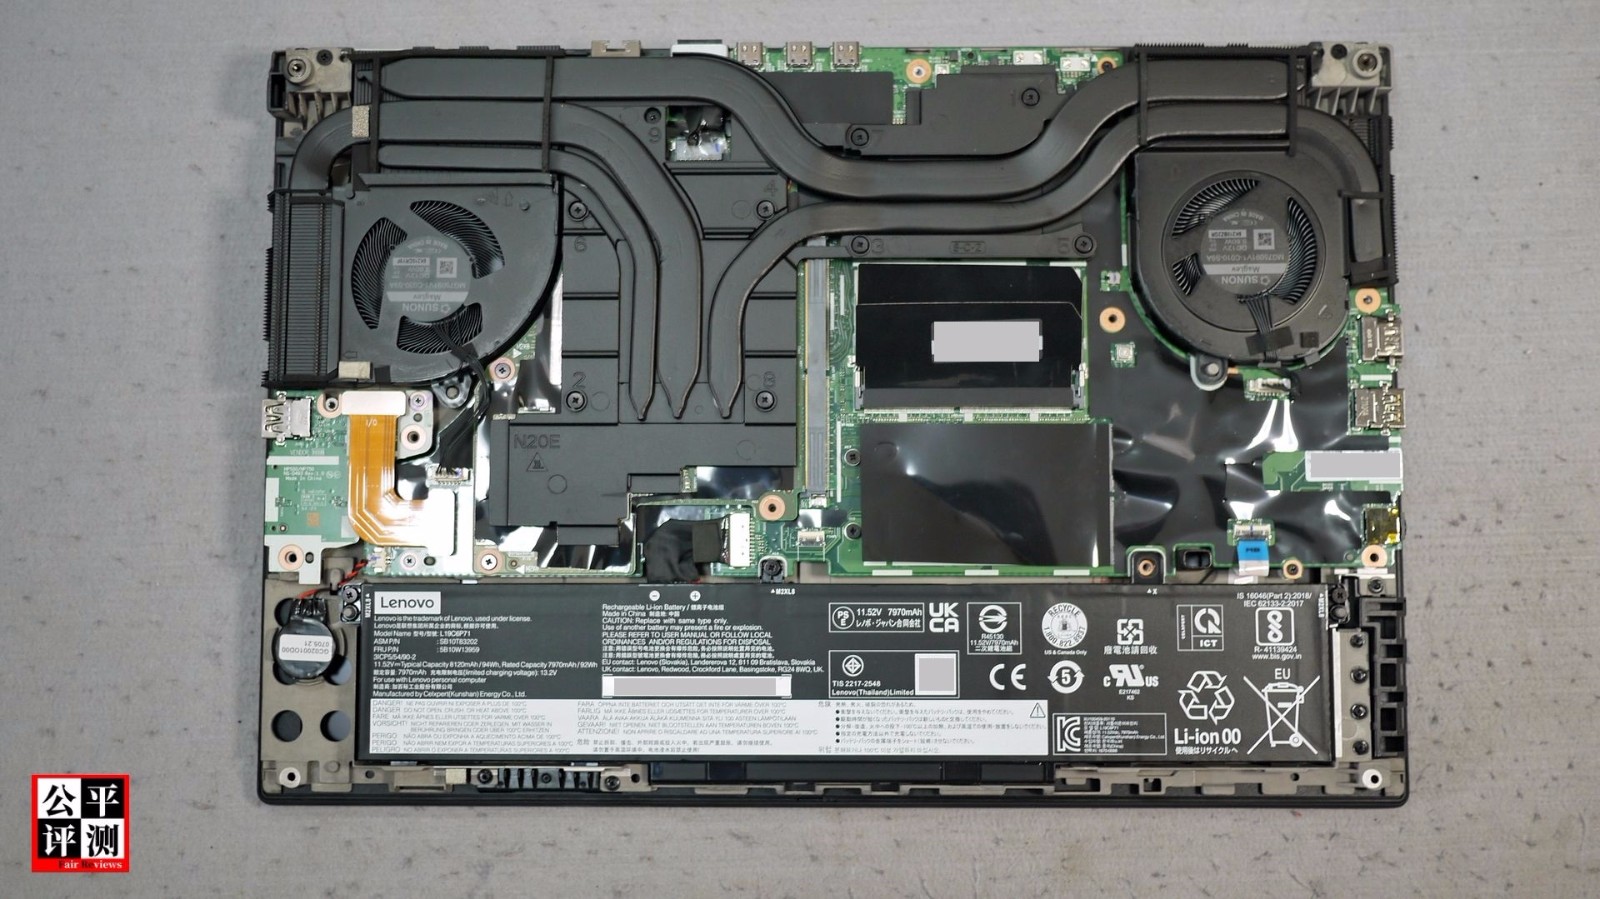
The cooling fan in the upper left corner is mainly responsible for the heat dissipation of the graphics card. The SUNON Maglev DC12V 9.60W marked in the center of the fan indicates that it is a Jianzhun maglev motor fan. There are 6 connecting cables between the model MG75091V1-C030C-S9A and the motherboard.
There are cooling fins on the left and back of the fan, which are connected to the cooling plate through three heat pipes. The N20E marked on the bottom left of the cooling plate indicates that this P15G2 is equipped with the highest NVIDIA RTX A5000 graphics card.

The cooling fan in the upper right corner is mainly responsible for CPU cooling. The brand specifications are the same as the graphics card cooling fan, but the model is slightly different: MG75091V1-C010C-S9A, and the connection cables between the motherboard and the motherboard are also six.
There are also two sets of fins, but there are only two heat pipes, and one is connected to the cooling fin of the graphics card fan, and the other is connected to the cooling plate of the graphics card at the same time. It is considered as mutual communication and joint operations. This is also the current laptop cooling system. Commonly used way.

The heat dissipation effect will be explained in detail in a follow-up article, and the disassembly work will continue first.
Although the built-in battery has been disabled in the BIOS settings when the machine was disassembled above, for safety reasons, you can first remove the built-in battery at this time, and place it between the motherboard and the battery at the lower right corner of the GPU heat sink, as follows Remove the connection cable between the battery and the motherboard in the yellow box on the left side of the figure, and you can physically disconnect the battery and the motherboard.
The frame on the right is marked with the ZIF interface of F5410, which is the interface of the SC card connection cable on the side of the motherboard mentioned above.

Then remove the three M2XL8 screws, you can easily remove the built-in battery.

The battery is a 6-cell lithium-ion battery, produced by Jiabaiyu, the factory time is June 2021, and the model is L19C6P71;
The standard capacity is 8120 mAh/94 Wh, and the voltage is 11.52 volts;
The rated capacity is 7970 mAh/92 Wh, and the charging limit voltage is 13.2 volts;
For other parameters, please refer to official data,
Regarding the battery life, the official has annotated: Use MobileMark 2018 to test the P15G2 equipped with FHD screen/i5-11500H/8GB memory/1 256GB SSD/T1200 graphics card/hybrid graphics card state/best battery setting, and it has no less than 9 Hours of battery life. The P15G2 and P17G2 tested by the author this time are both basic top-of-the-line configurations. The actual test results of the battery life of the two will be published in a follow-up article.

After removing the battery, the battery compartment exposed in the lower half of the P15G2 has a part of the hollow on its left side. Since the keyboard frame is already under the north area at this time, you can directly see the screen on the B side. The L-shaped white cable extending from the middle to the motherboard is used by the touchpad.

On the left side of the battery compartment, a round black plastic encapsulated CR2032 motherboard battery is placed, which is a significant waste of space;

The space on the right side is not small, and the roll cage is partially raised and filled with a black plastic block;

Above the CR2032 motherboard battery on the left side of the fuselage at the bottom is an independent small circuit board with an SD card reader and a USB-A port. It is connected to the motherboard with an L-shaped cable. It can be easily removed by removing a screw Remove.
Here, the author reminds two points:
The first point: last year’s previous generation models, that is, between ThinkPad P15 Gen 1 and P17 Gen 1, are still this small circuit board, and the port has been differentiated-the small circuit board of P17 Gen 1 , One more USB-A interface;
The current P15G2 and P17G2 are exactly the same in terms of port layout, quantity, and type. In other words, this small circuit board is also designed for both.

The second point: In the follow-up test, the author found that this small circuit board had performance problems. Therefore, the P15G2 and P17G2 small circuit boards have been tested and repeatedly disassembled, but have not understood the reason.
It was not until a week later that the third Core Core Edition P17G2, which was borrowed for testing, arrived. After three comparison tests, it was finally determined that there was a design problem. The details will be sent out in the follow-up article, so I will skip it here.

Looking back at the connection between the P15G2's graphics card and the motherboard, although it is a standard MXM slot, but because the graphics card is not a standard MXM shape, it is impossible for users to change to other manufacturers' MXM graphics cards- --Don't care about the VBIOS firmware.

In addition, it seems that the VirtualLink alliance led by NVIDIA and Oculus ceased operations. NVIDIA’s new graphics card no longer has a USB-C port, so a USB-C port originally integrated on the previous generation P15/P17 Gen 1 graphics card is also Changed to be integrated on the motherboard, so the physical location of the USB-C port on the back of the P15G2 fuselage is finally on the same level as the two Thunderbolt ports.
In this way, the upgrade attempt of the previous generation P15G1 to install its latest A5000 graphics card can be initially declared to be shattered...

In order not to damage the original state of the cooling system and to avoid affecting the actual test results, the author has dismantled the P15G2 so far. The following figure is a summary of the author's dismantling of the P15G2.

Next, start to compare the parts and parts of the disassembled P15G2 and P17G2 one by one.
Act freely
Going straight ahead means following your wishes and achieving success smoothly.
As stated at the beginning and end of serial 1, the author originally planned to only purchase P17G2 for evaluation this year, but due to the delay in receiving the order for three months after the purchase, I was forced to modify the order to P15G2, which made the evaluation of P17G2, The beginning is to change to the evaluation of P15G2;
After the additional purchase of P17G2 arrived, I felt that merging the evaluation articles of the two into one should reduce the workload, so the final modification was a comparative evaluation of the two.
Although after the arrival of the P15G2, the author immediately carried out the unpacking test and completed the disassembly picture and text of the P15G2 above.
But after the additional purchase of P17G2 arrived, in order to achieve a disassembly comparison between the two, I had to disassemble the P15G2 again. In this way, the total amount of work brought in to complete the comparative evaluation articles has not actually decreased, but has increased over the completion of two separate evaluation articles. As a result, the progress of serial publication of articles has been delayed again.
In any case, to compare P15G2 and P17G2 as best as possible, now is the author's wish and what many readers hope for. Such a rare opportunity, of course, go straight!

The disassembly sequence, screw locking and precautions of the P17G2 are the same as the P15G2. First, the internal battery is disabled and the bottom door is opened. The bottom doors of the two are completely the same after comparison and can be interchanged:

Next is to remove the keyboard, the two keyboards can be used with each other exactly as mentioned above:
However, the P17G2 keyboard connection cable has a different interface at the end of the motherboard-due to the difference in body size, the P17G2 uses the method of extending the motherboard keyboard cable interface:

The mainboard keyboard cable interface is extended to an independent small circuit board. This small circuit board is fixed on the C-side roll cage with two screws, and can be easily removed by removing the two screws.

Both memory module brackets are locked with three screws, but the locking positions are different:

Both The size of the memory module brackets is basically the same, and there are obvious differences in surface shape, hole position and hollowing, which cannot be used universally.

Next, you need to remove the extension small circuit board of the keyboard interface of the P17G2 mainboard mentioned above before removing the connection cable between the fingerprint reader and the mainboard under the keyboard frame.
After that, you also need to unplug the cable between the P17G2 power button on the keyboard frame and the motherboard.
You can start to disassemble the P17G2 keyboard frame (Keyboard bezel assembly).

The back of the keyboard frame of the removed P17G2 is compared with that of the P15G2. You can see the difference between the installation position of the power button and the fingerprint reader on the back.

After removing the keyboard frame, you can see that in the lower left corner of the keyboard area of this P17G2, the WWAN card slot is empty, and on the right side of the palm rest, there is a factory pre-installed smart card reader (Smart card reader);

Remove the two M2X3 screws and loosen the connection cable between the main board and the smart card reader.

The P17G2 speaker assembly located on the C side near the B side has the same horn size specifications as the P15G2, but the projected area of the entire component is larger than that of the P15G2. It seems that the sound quality may be better, so the two cannot be used in common.

After removing the keyboard frame of the P17G2, you can start to remove the base cover assembly. Compared with the bottom cover of the P15G2, you can see that the black plastic filler block in the lower right corner of the inner side is more unscrupulous.

After removing the bottom cover, the bottom of the P17G2 is at a glance. The huge area of the body and the waste of a lot of space make its built-in battery seem very small.

However, the P17G2 battery, which seems "small" in comparison, is actually completely common with the battery used in the P15G2, and both are 6-cell, 92-watt-hour high-capacity batteries.

In the exposed battery compartment, there is one more cable to connect the smart card reader on the left side than the P15G2. The space under the smart card reader, in the P17G2 roll cage, uses 12 grids for simple and rough filling. .

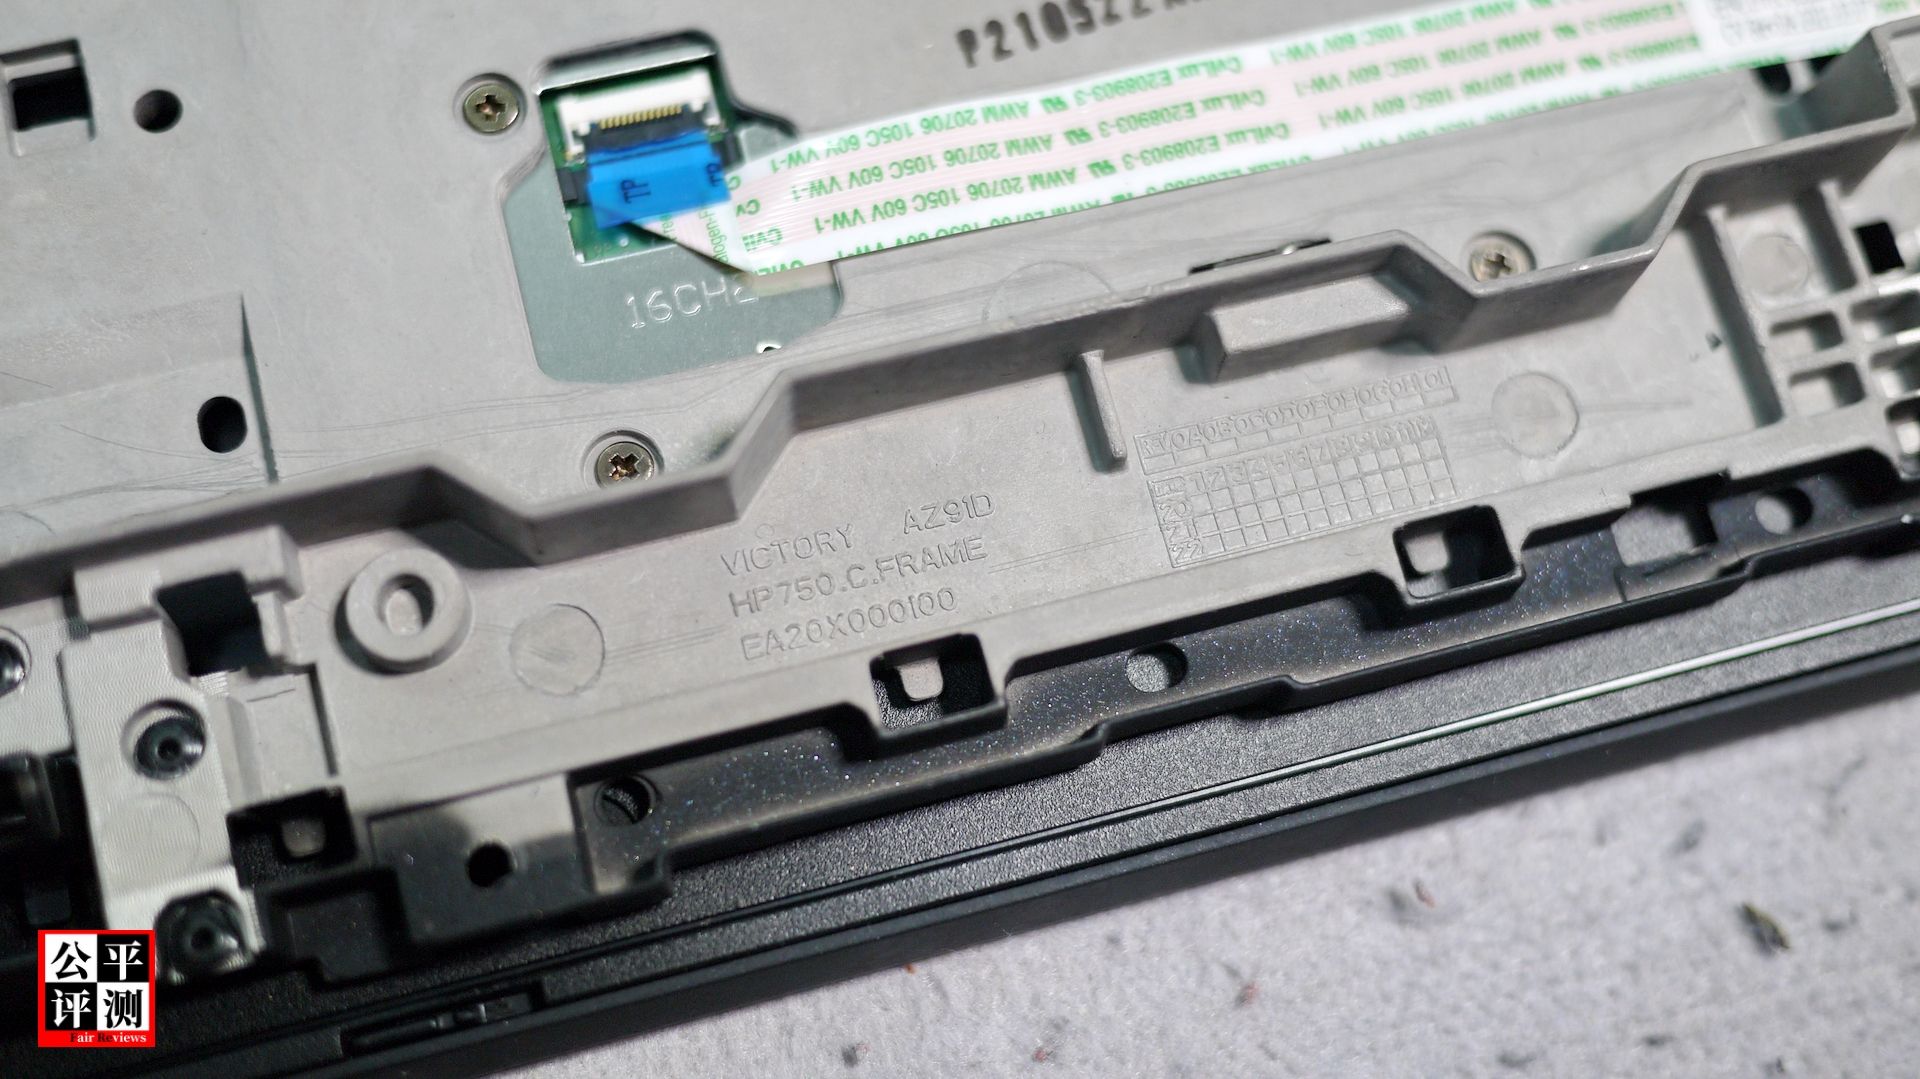
Therefore, the two roll cages are not universal at all. The roll cage of P17G2 is marked with HP750.C.FRAME----note that it is no longer the GP740 marked in other parts----HP to GP, 750 to 740 , What does this mean?
In fact, it is very simple, HP means no 17-inch T17g for GP;
750 vs. 740 means that compared to ThinkPad P17 Gen 1, because of the addition of a PCIe 4.0 SSD location, the P17G2's roll cage has undergone a minor update.
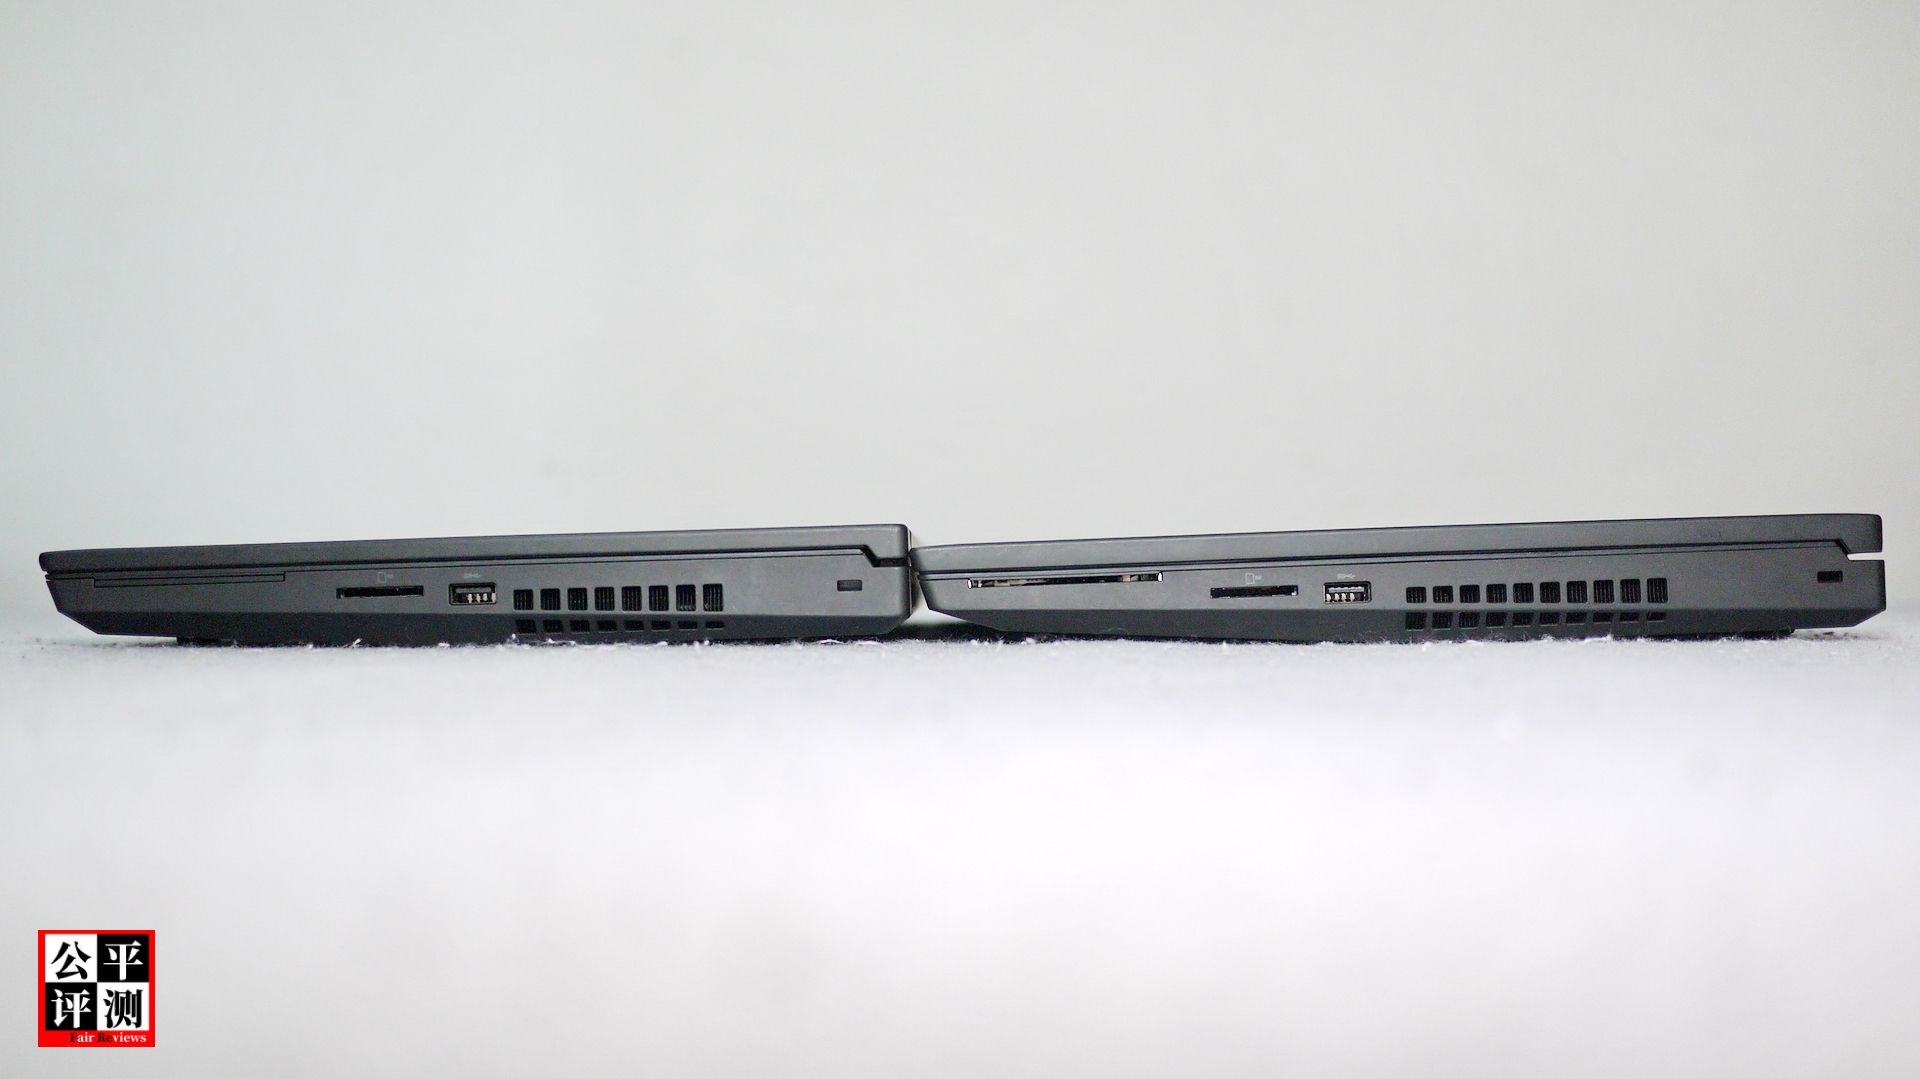
After removing the bottom cover, the bottoms of the P17G2 and P15G2 can finally be compared: the layout of the two can be seen, and they are generally arranged in alignment with the right side of the bottom viewing direction.

The two motherboards are completely interchangeable and universal on the physical hardware;
The respective body shells and roll cages are completely non-universal-there is no need to disassemble them for comparison.

In the layout of the main structural parts, the two are consistent, but there are differences in the details of the connecting parts, for example: the locking methods of the screen axis of the two are different;

The USB-A and SD card reader independent small circuit boards on the right side of the fuselage are universally interchangeable, but use different cables.

The most critical difference between the two lies in their respective heat dissipation components.
But in the CPU part, there is no difference:
The fans used are all Jianzhun maglev motor fans, the model is MG75091V1-C010C-S9A;
The number, size, length and layout of the heat pipes used are also exactly the same;
The number, size and layout of the cooling fins used are also exactly the same;
This means that, regardless of the GPU, the two should be the same in terms of CPU heat dissipation.

The difference is in the GPU part:
The cooling fan model of P17G2 is MG75091V1-C020C-S9A;
The cooling fan model of P15G2 is MG75091V1-C030C-S9A;

The layout of the cooling fins used is the same, but the number and space occupied are obviously different;
The number and layout of the heat pipes used are the same, but the difference in length and size is obvious, especially the heat pipe of the P17G2 near the fan, which is obviously thicker.
After editing the official pictures of the two heat dissipation components, the author put them together for a positive comparison. It can be seen more clearly that the two are beginning to differentiate on the left side of the red dotted line.

In addition to the difference in the size of the heat pipe on the front side close to the GPU fan, the same is true on the back side: the two are on the right side of the red dotted line, and they are beginning to differentiate.

Both GPU cooling fans are built-in magnetic levitation motor fans. The parameters are both DC12 volts and 9.6 watts. They both use 5+1 cables. There is only one number difference in the model.

As for the thickness of the fan, heat sink fins and the entire heat sink assembly of the two, they are all the same.

After careful searching, the author found clear pictures of C010C, C020C and C030C, and found that the number of C020C fan blades used in P17G2 is less than that of C030C used in P15G2, but the length and curvature of the fan blades are larger than P15G2----- One trades the other, the driving voltage and power consumption of the two are the same. When the speed is the same, the air flow per unit time may be the same. The only difference is that the noise is different. --But there is a question: Will the speed be the same when the two work at full speed?

As a heavy-duty laptop, the 15-inch P15G2, even if it is not a touch screen version, is thicker than 31mm, which is undeniably thicker than the 17-inch DELL Precision 7760 which is less than 29mm;
The 17-inch P17G2, due to the increased thickness of the screen cover, the thickness of the whole machine exceeds 32mm.

Although the thickness of the three is only about 2-3 mm, but in terms of weight, P15G2 and P17G2 are also heavier than 7760-P15G2 is 60 grams heavier than 7760, and P17G2 is 660 grams heavier than 7760...
Because the thickness and weight of the 15-inch P15G2 exceed the 17-inch 7760, the author believes that there are two main reasons:
1. The heat dissipation systems of P15G2 and P17G2 are relatively straightforward and rude in design. The author thinks that if it is replaced with a vacuum heat plate design, it should be optimized in terms of weight or thickness.
2. Both insist on adopting a roll cage design on the C side, and a lot of space is wasted using filling design, which brings further increase in volume and weight.

In the end, when the bottom covers of the P15G2 and P17G2 were removed, the first thing that came to the surface was the black and heavy heat dissipation system of the two.

Press the bridle
After paying the price of thickness and weight, how will the performance brought by the heat dissipation effect of the two compare with DELL Precisio?
Is there any difference in GPU cooling effect between the two? If so, what kind of GPU performance difference will it bring?
In other respects, what is the difference between the P15G2 and P17G2 twins?

At this point in the Part 2, the text has exceeded 4000, and the pictures are approaching 80. I can only end the Part 2 again. The actual boot tests of the P15G2 and P17G2 will start in the Part 3.
Many of the above problems, due to the four models of P15G2, P17G2, DELL Precision 7560 and 7760 involved, the number of tested machines is as many as five (of which P17G2 has a top configuration and a medium configuration), there are a lot of data, the author only Can move slowly, one by one.
Stay tuned!
Post your Opinion